- Table of Contents
- Intro
- Product Selection
- Testing
- Writing
- Conclusion
- Comments
How We Test Robot Vacuums
Transforming Data Into Objective Reviews

We first started testing robot vacuums as part of our vacuum testing. As robot vacuums have become more and more sophisticated and specialized, we split them off into their own product category and have developed tests specifically for robot vacuums. We put every robot vacuum we test through the same standardized suite of tests to ensure they all receive the same evaluation, and our writers ensure that everyone understands how each model stacks up. We've now tested over 75 robot vacuums and counting. We have teams dedicated to product selection, purchasing, testing, photography, writing, and editing to provide you with transparent, unbiased reviews so that you can find the best robot vacuum for your needs.
Read on to find out how we test robot vacuums from start to finish.
Product Selection

Before reviewing any robot vacuum, we have to select which one to test. Due to the sheer number of models, we can't test all robot vacuums; we rely on recommendations from you, the user, while also covering new, innovative, or downright cool robot vacuums that generate a lot of excitement among the community.
Using our voting tool, you can vote on which robot vacuum you'd like us to test. You get one vote every 60 days, and insiders get 10 votes every 60 days. At the end of that period, we buy the product with the most votes as long as it has 25 votes or more.
We'll also buy certain robot vacuums if they introduce a new must-have feature, are particularly innovative, represent a new standard in the industry, or create a lot of interest. We also monitor our forums and Discord and will occasionally buy products based on discussions there.
We always buy retail units, just like you would, through well-established retailers like Amazon or Best Buy. This means we don't receive "golden" units built by manufacturers specifically for testing; we get regular retail units exactly like you might buy. This ensures unbiased, impartial reviews reflecting the average user experience.
Testing
Before we get into the testing process, here's a little background on why we test robot vacuums the way we do.
Philosophy
Our website is built around standardized testing. We test every product in a product category in exactly the same way. Each robot vacuum goes through the exact same series of tests using the same testing devices, materials, and conditions. When you compare the same test on two robot vacuums by reading the two reviews side-by-side, by using our compare tool, or by showing individual tests using our table tool, you can be sure that one is better than the other at that specific test. Even if a robot vacuum doesn't have mopping ability, we conduct the same mopping test that we carry out on every robot vacuum so that you can see the results for yourself and compare them to every other robot vacuum we've ever tested.

First Steps
Once we receive and unpack the robot vacuum, one of our two professional photographers will take photos of the product. These aren't glitzy marketing photos with fancy backgrounds—they're taken in our lab and show the robot vacuum as truthfully, honestly, and transparently as possible. These are real photos of the actual product with no manipulation, all taken in the same way to be comparable. Then, the unit is assigned to one of our experienced testers.
You can track the progress of a purchased product through our process using the status tracker at the top of the main discussion product page in our forums.
Testing Process
Our tests fall into three categories: Design, Performance, and Automation. Some of these tests are measurements or simple yes/no questions that deal with the unit's inherent properties: the robot vacuum's equipment, measurements, capacities, etc. The other tests follow a predetermined set of consistent, standardized testing methods. We always use the same testing equipment and the same conditions.
| Design | Performance | Automation |
|---|---|---|
| Build Quality | Hard Floor Pickup | Physical Automation |
| User Maintenance | High-Pile Carpet Pickup | Companion App Automation |
| Recurring Cost | Low-Pile Carpet Pickup | |
| Dimensions | Pet Hair Pickup | |
| Internal Dirt Compartment | Airflow | |
| Station Maintenance Capabilities | Noise | |
| In The Box | Household Adaptability | |
| Battery | Obstacle Avoidance | |
| Quality-Of-Life Features | Height Clearance | |
| Brushroll And Tools | Threshold Clearance | |
| Air Quality | ||
| Cracks | ||
| Stains | ||
| Water |
Design
Some design tests are self-explanatory, but we should examine some less obvious ones.
The Build Quality test is a subjective analysis of the robot vacuum's build quality, including its construction materials, how well it fits together, and how solid and sturdy it is. Is it made of materials that will show marks or scratches? Are there any weak areas you'll find as you physically interact with the robot vacuum? Are there any parts that seem fragile?
The User Maintenance test scores the robot vacuum against the normal maintenance tasks you usually perform on a robot vacuum. The tester removes or cuts hair from the brushroll, empties the dustbin, cleans the filters, and removes the dirtbag from the docking station, should the robot vacuum be equipped with one. The score reflects how difficult these tasks are and the number of parts that you would need to clean or maintain. Recurring Cost scores the yearly cost of servicing a robot vacuum against other robot vacuums. We list the replacement parts and their replacement frequency based on the manufacturer's recommendations. These parts usually include the brushroll, brush guard, side brush, filter, mop pads, and the docking station's dirtbag, if applicable.
The Dimensions, In The Box, Quality-Of-Life Features, and Brushroll And Tools tests are unscored and merely consist of photos, measurements, or a list of features. Internal Dirt Compartment, Station Maintenance Capabilities, and Battery tests are scored in terms of capacity against other robot vacuums since a robot vacuum might be better or worse than others in these factors.
Performance
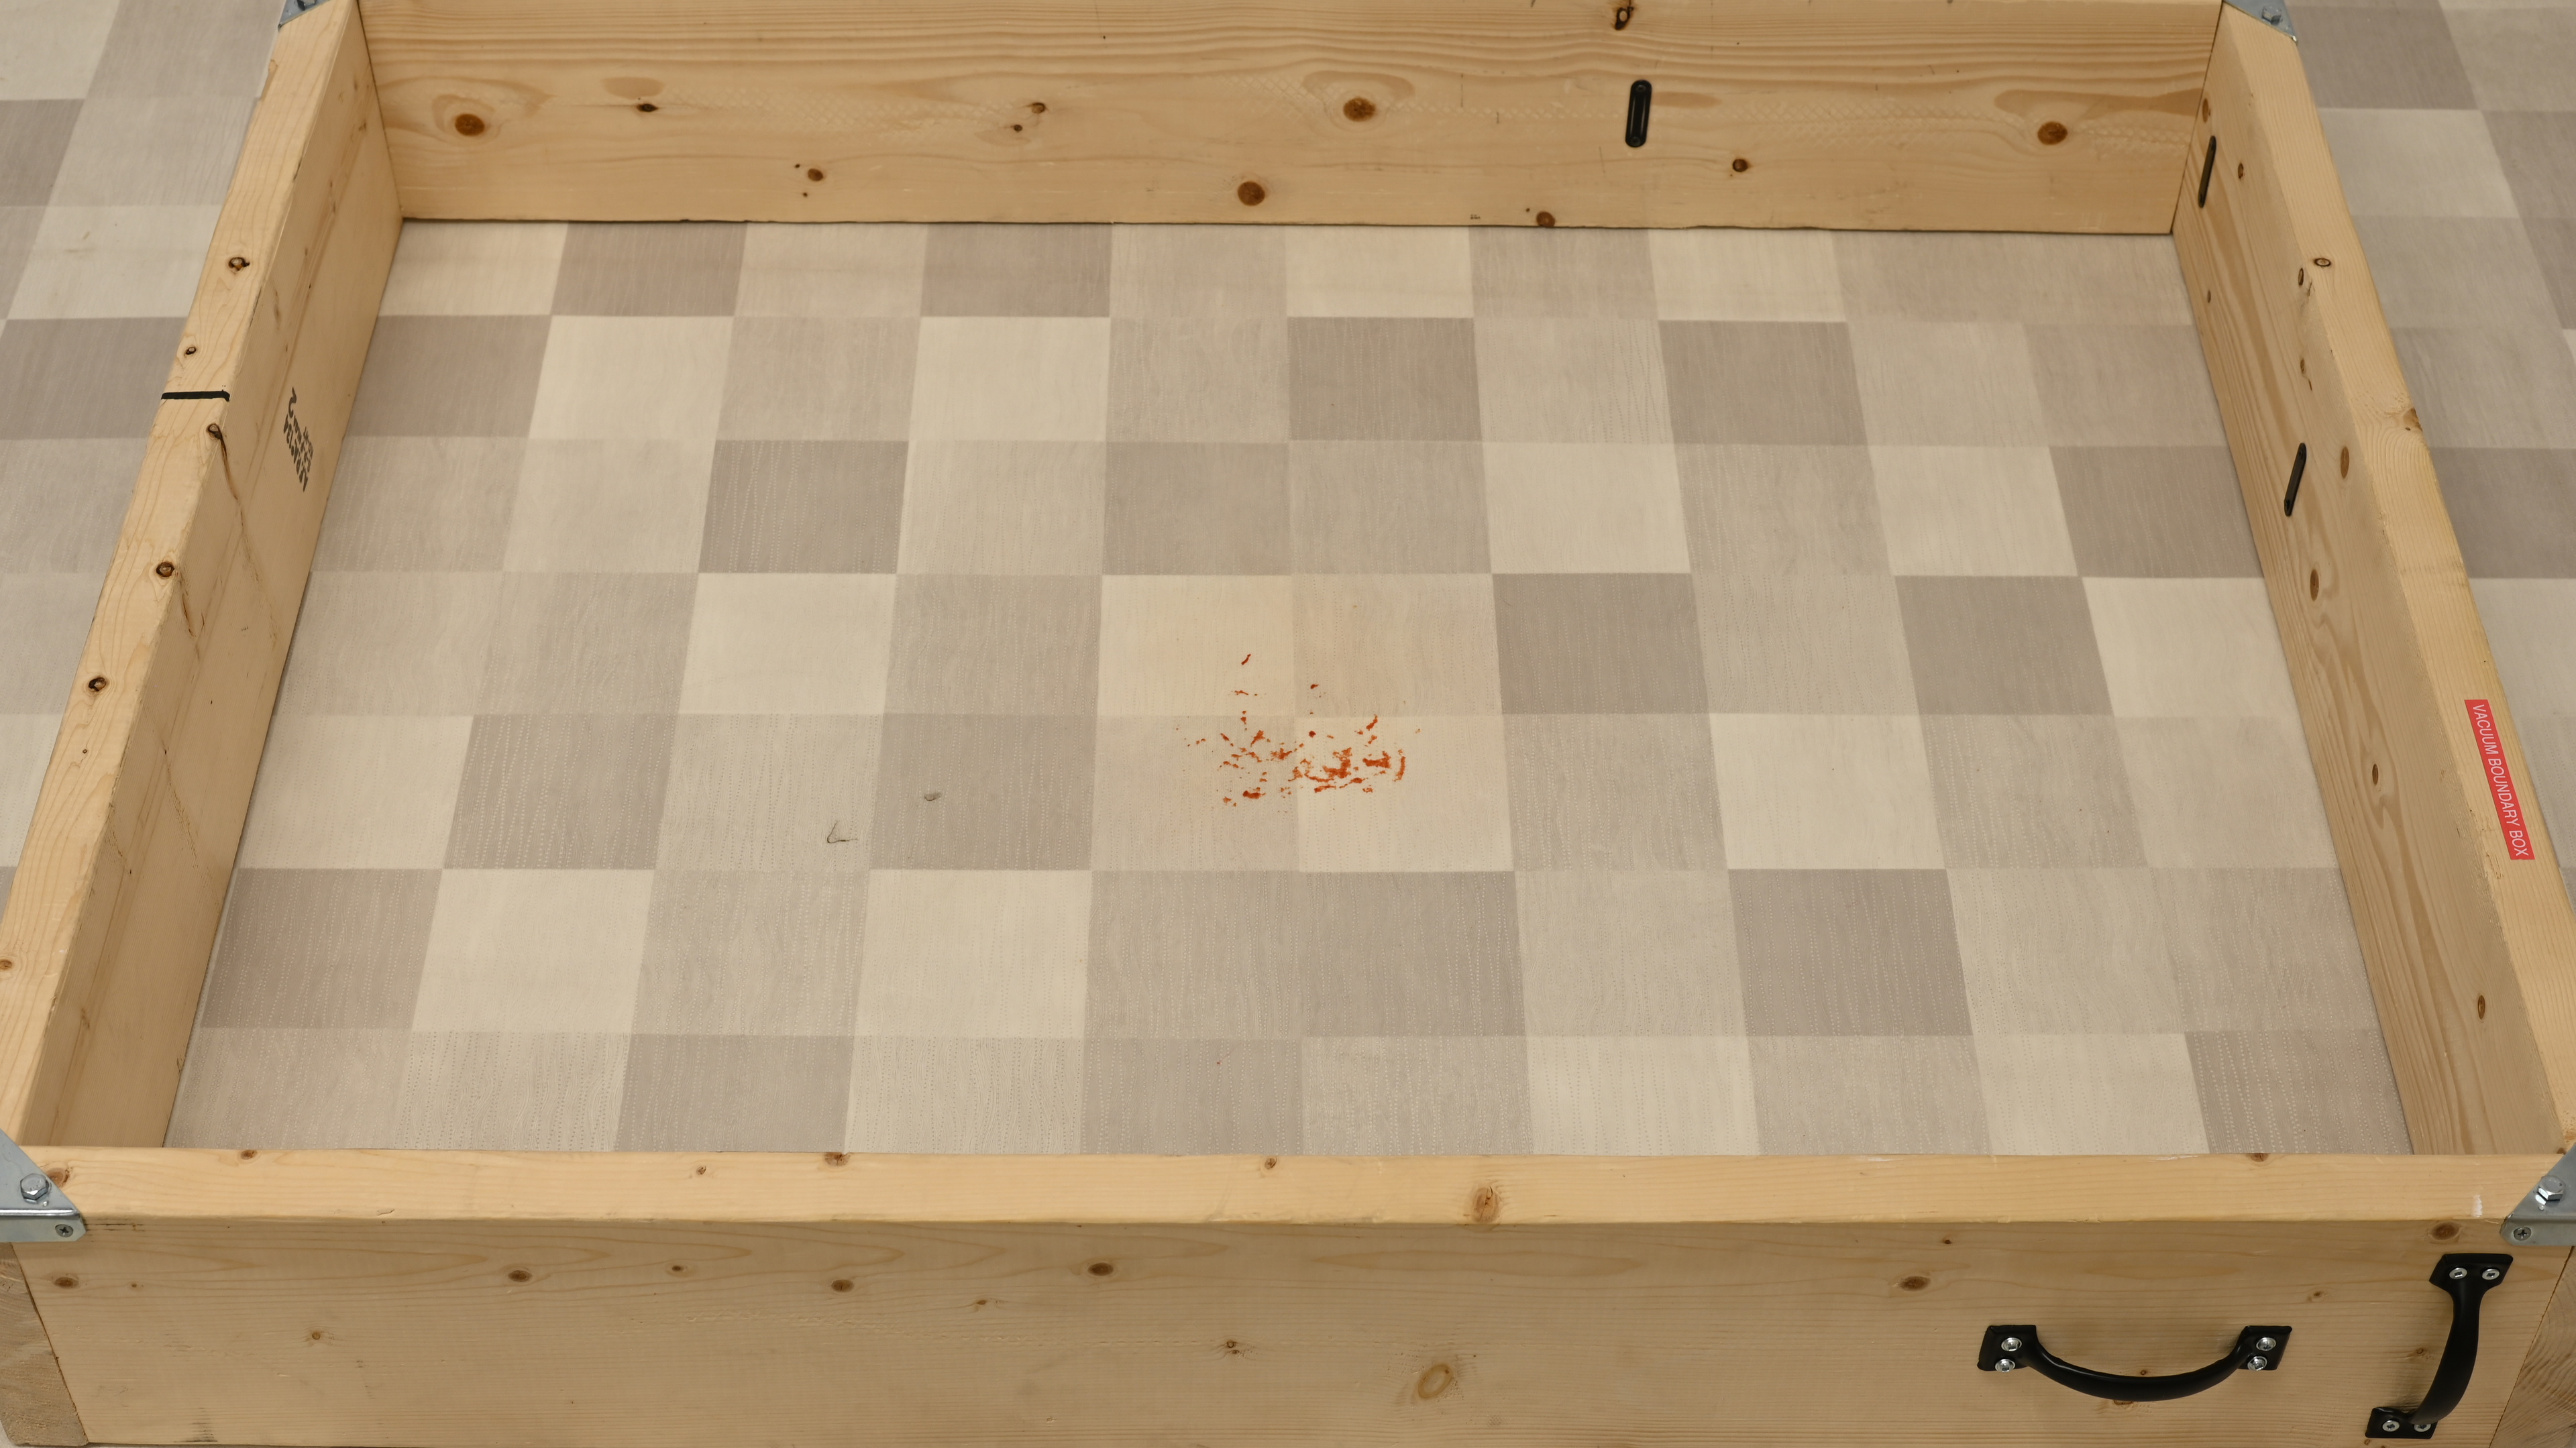
In Hard Floor Pickup, Low-Pile Carpet Pickup, and High-Pile Carpet Pickup tests, we place the robot vacuum in the same bounding box on the given floor surface and deposit a mix of fine, medium, and large material over the same area encompassing a corner. We use sand to represent fine material, rice to represent medium material, and cereal to represent large material. The same amount of material, mixed in the same ratio, is used for every test to ensure comparability. The tester chooses settings appropriate for the floor surface or lets the robot vacuum automatically determine settings based on its sensor data. We then let the robot vacuum complete the cleaning task and evaluate the results. We score the results subjectively based on how you would determine cleaning results in your home—how much fine, medium, and large debris the robot vacuum leaves, how much debris it leaves along edges and corners, and whether the robot vacuum's side brush flings debris around.

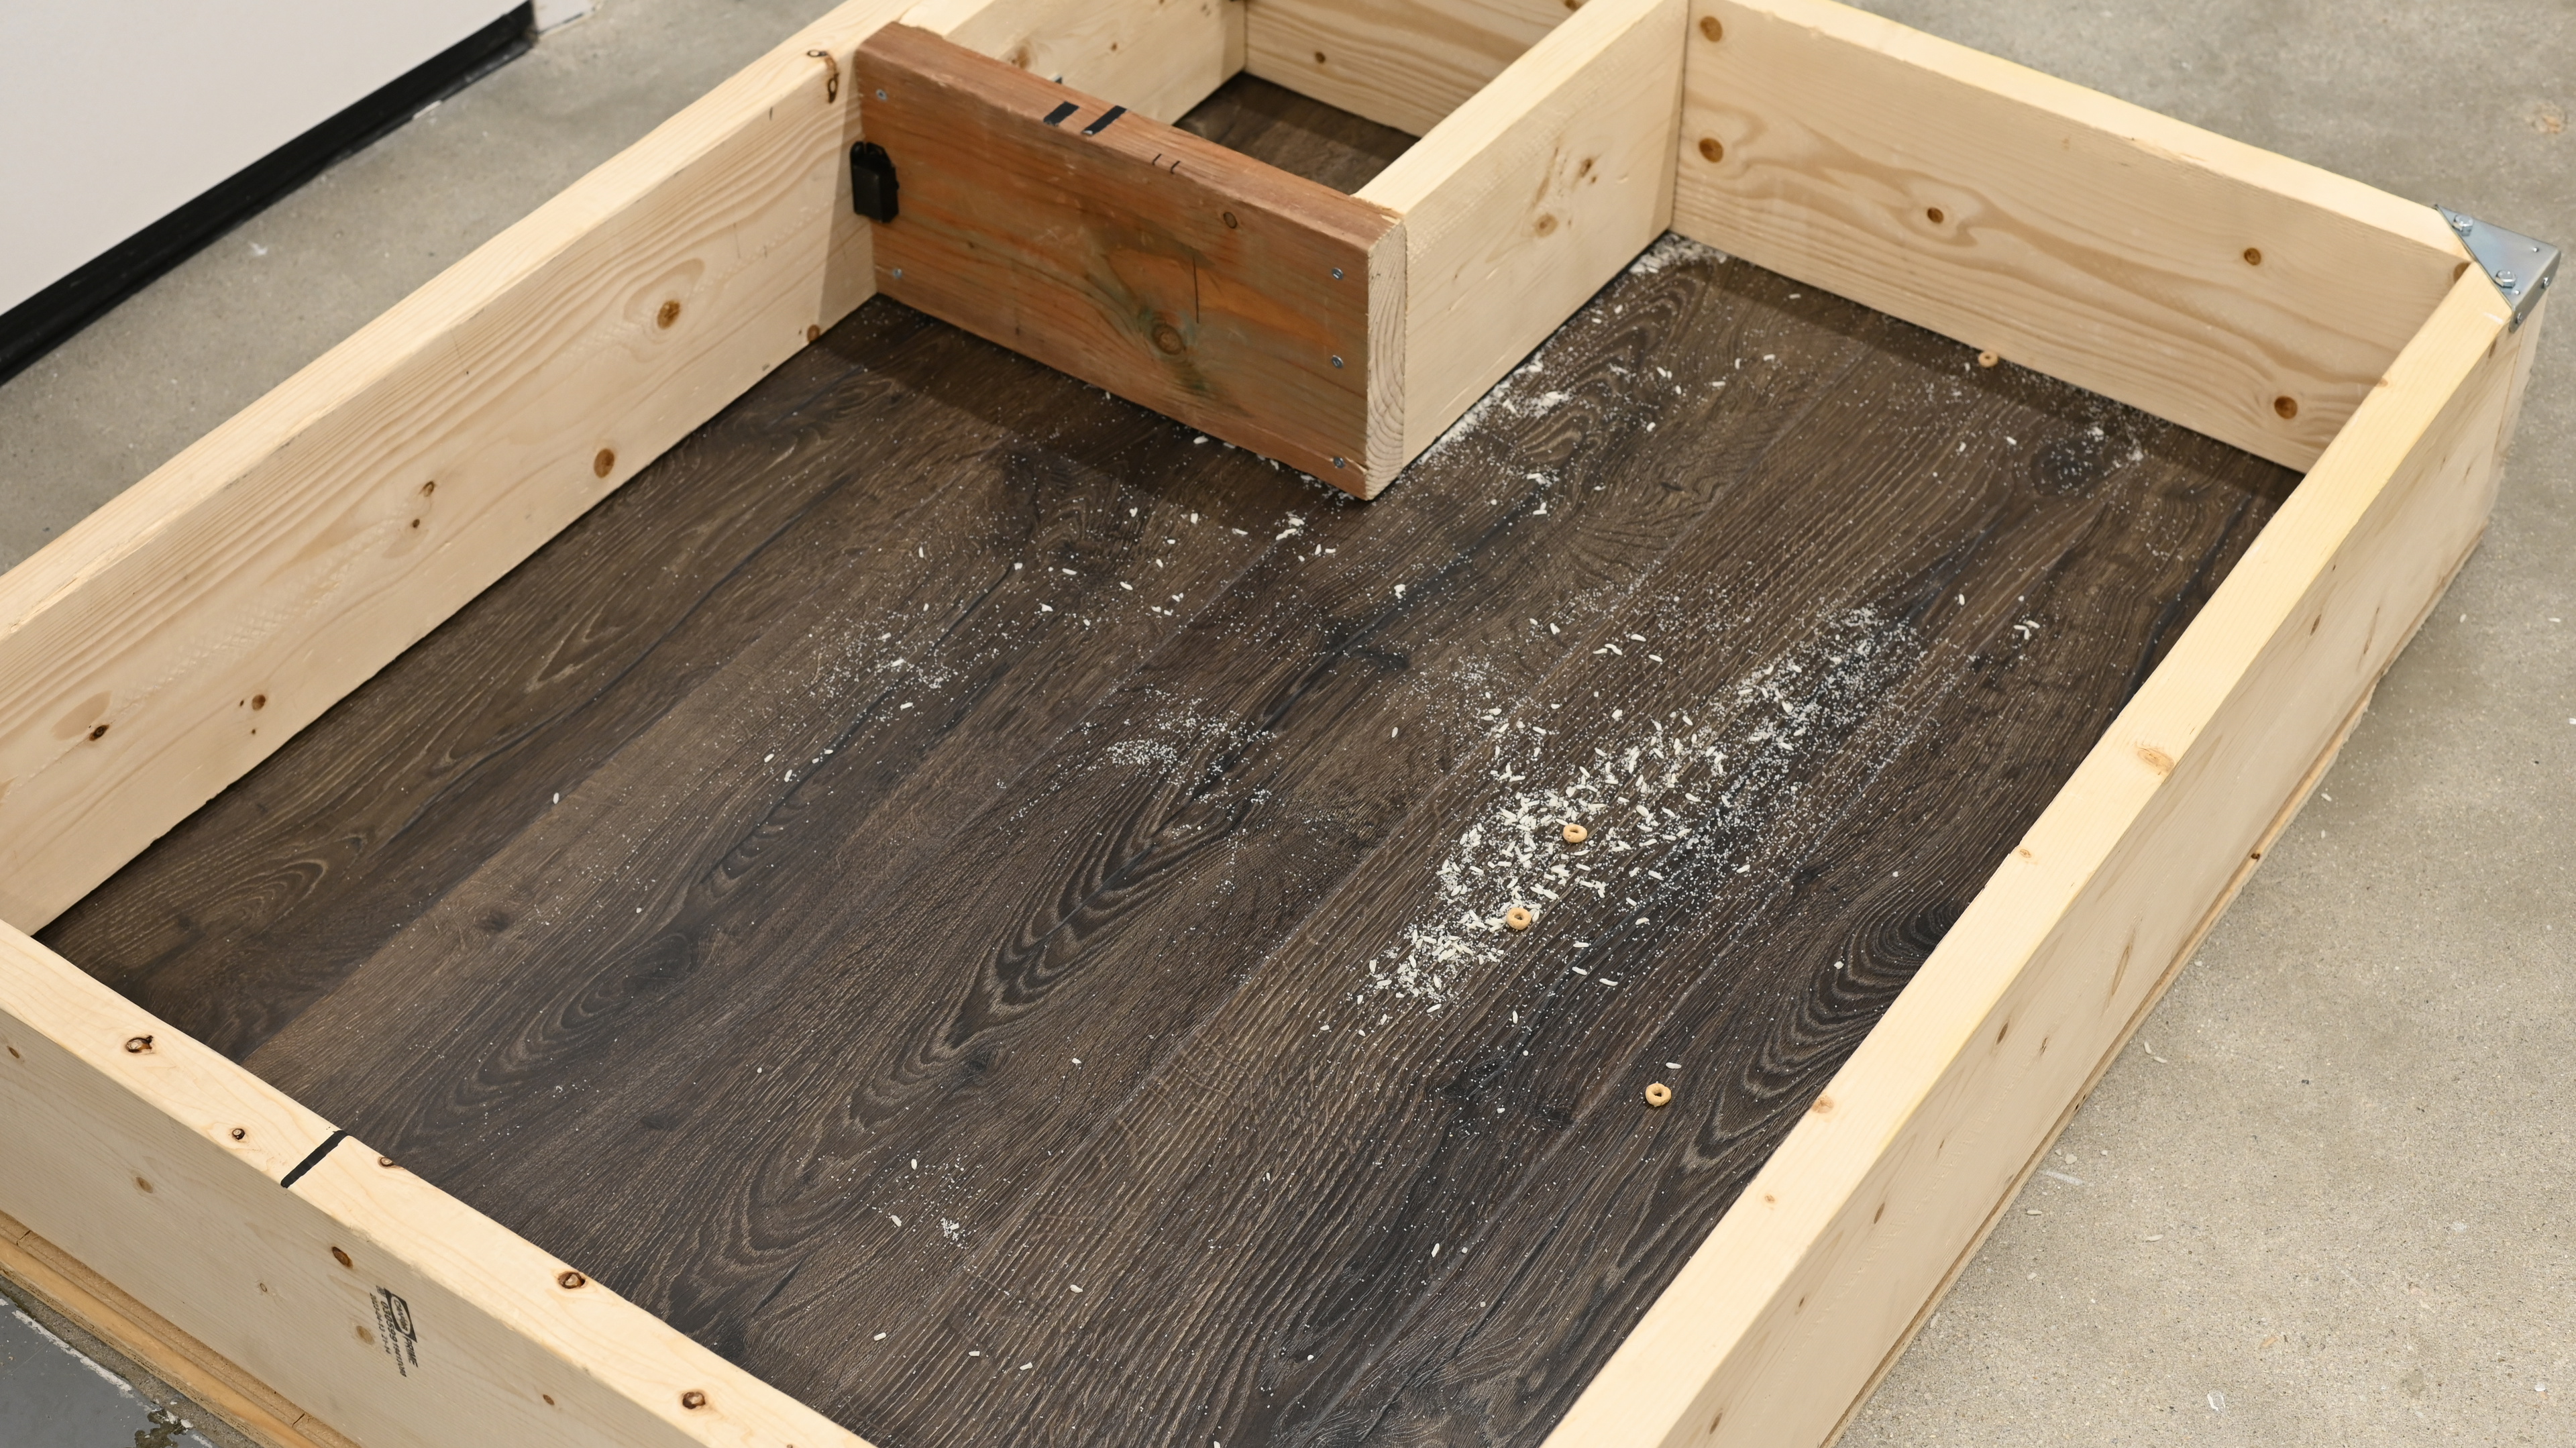
The Pet Hair Pickup test is a little different. We remove the corner piece from our bounding box and set the box on low-pile carpet. We measure out the same weight of synthetic pet hair every time, spread it over the same area, and press it in using the same weighted roller. This represents a realistic household situation with some pet hair lightly embedded in the carpet and some just lying on top, pressed down.
In the Household Adaptability test, we place the robot vacuum in what might be a typical room with a mix of typical furniture placed in the exact same location every time. We've chosen furniture that's known to cause problems with robot vacuums:
- A floor-length mirror (does the LIDAR sensor's light beam reflection cause the robot vacuum to map out a non-existent room?)
- Low furniture (does the robot vacuum clean underneath properly and not get stuck?)
- Chairs with horizontal legs, one chair at an angle (does the robot vacuum clean the entire area underneath and not try to climb up on the leg, and does it get stuck?)
- A coat rack (this is a very tricky obstacle; it presents a thin obstacle to the robot vacuum, but it's very tall. Does the robot vacuum avoid it entirely? Does it shove it around or knock it over? Does it try to climb up on the legs, and does it get stuck?)
- A loose tasseled rug (does the robot vacuum suck up the loose rug, pulling it up and getting stuck? Does the robot vacuum pull up the tassels, jamming the brushroll?)
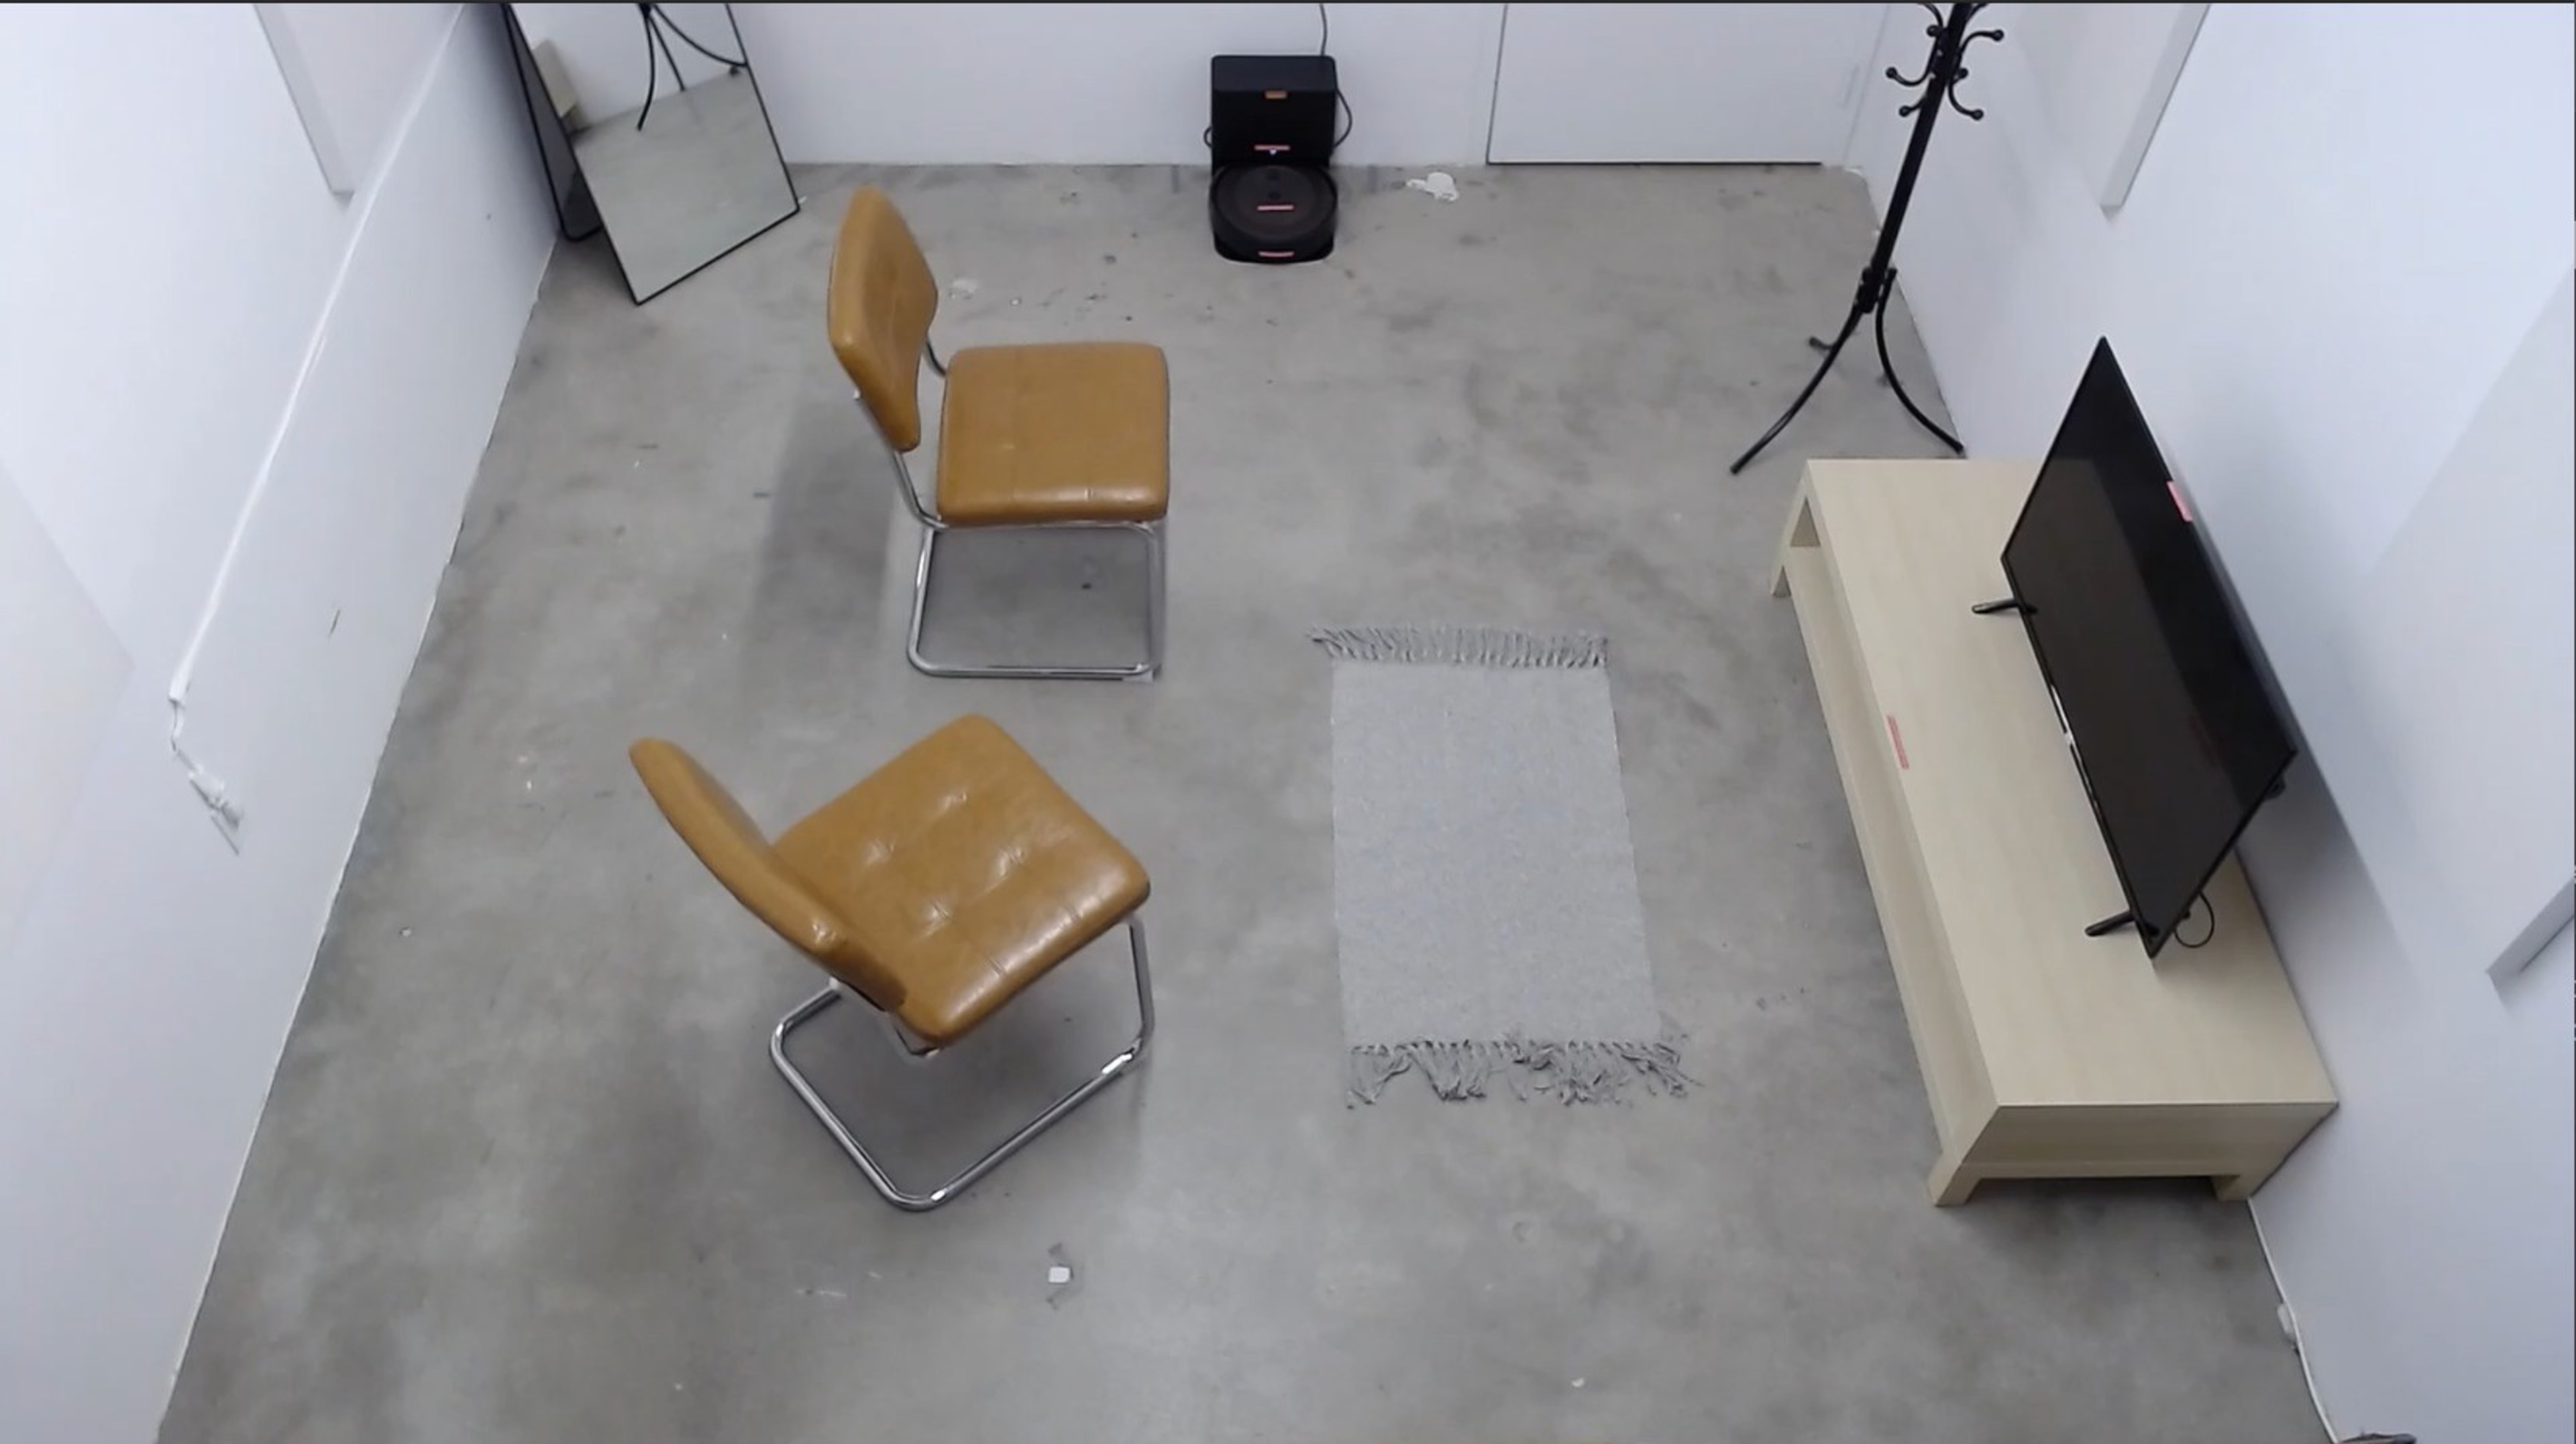
We take a video showing how the robot vacuum adapts to household obstacles in our torture chamber. The tester records its successes and failures and calculates the score.
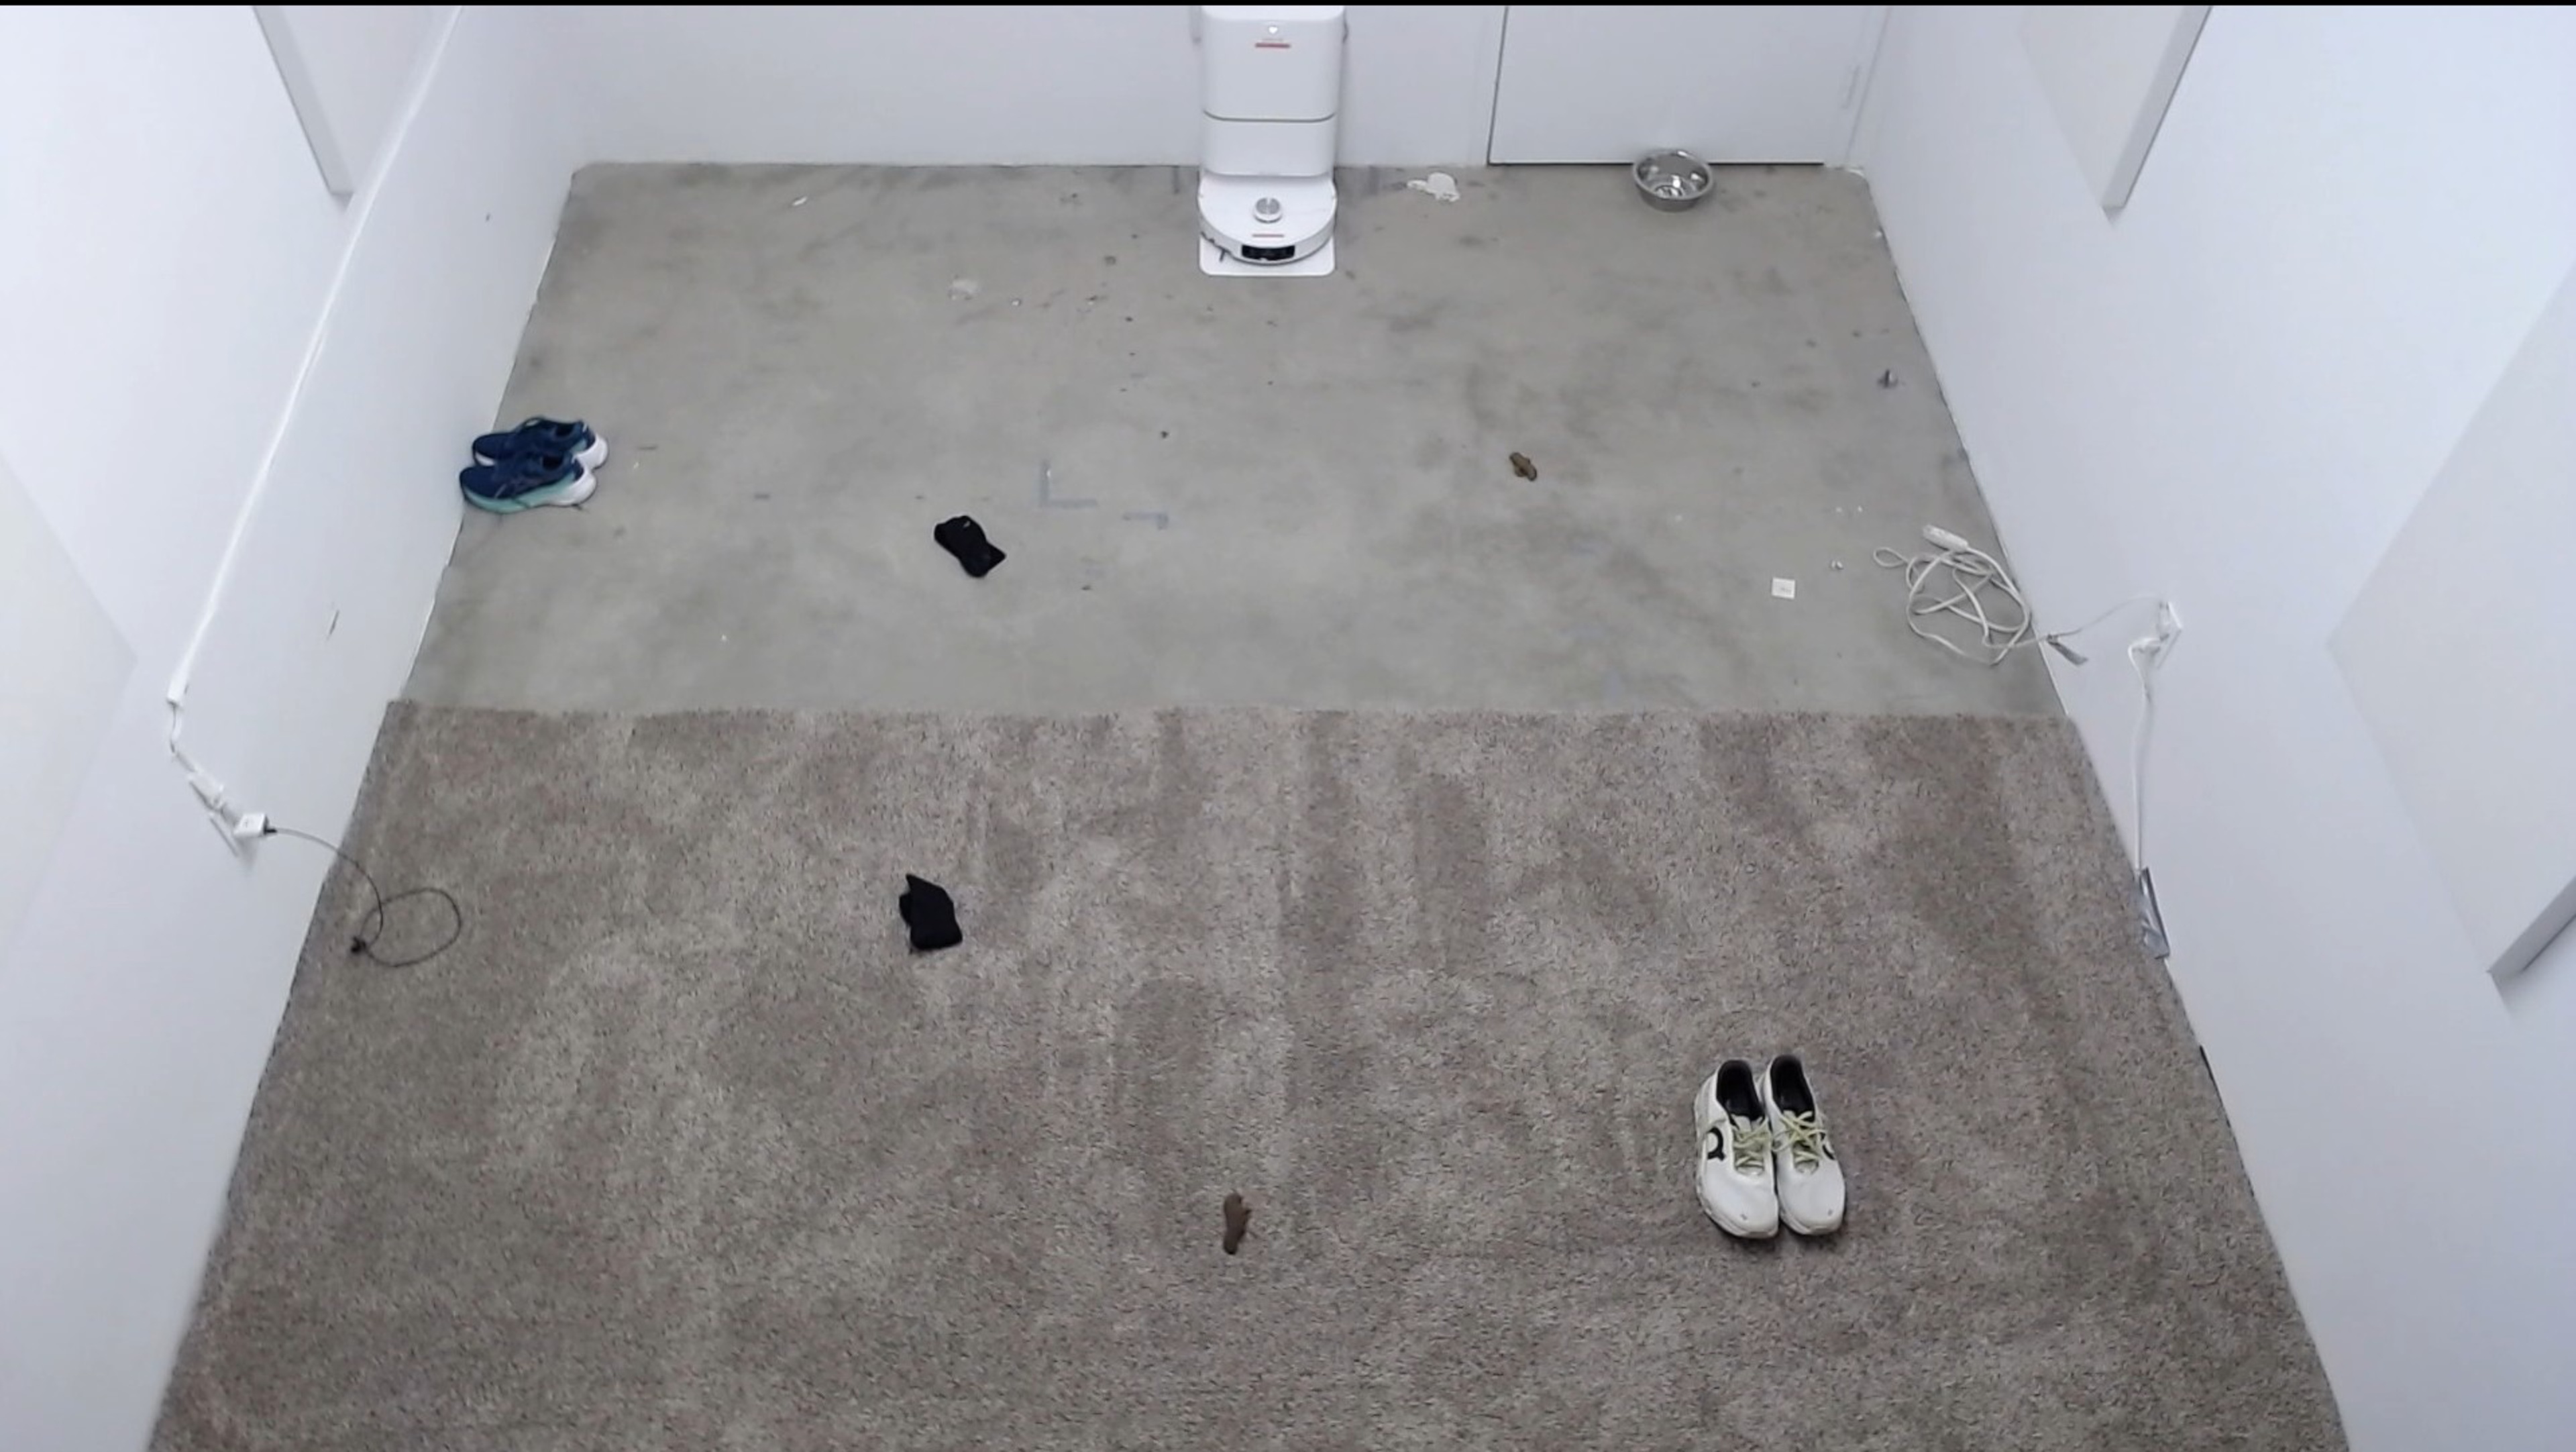
We remove the furniture from the room and place a large carpet covering half of the room for the Obstacle Avoidance test. The tester then places common obstacles in the same locations each time on the bare floor and carpeted sections of the room. These obstacles are ones a robot vacuum is likely to encounter in your home, like shoes, socks, USB cords, extension cords, and pet bowls, or ones which you'd never want a robot vacuum to ever touch, like pet waste—fake pet waste here, of course! We take a video of three tests and record the results, keeping track of how often the robot vacuum touches an obstacle, how often it avoids an obstacle, and how often the tester has to step in to help out the robot vacuum when it gets stuck. These results determine the score.
The other tests are fairly straightforward. The tester conducts the tests, makes measurements, and records the data.
Automation
The Physical Automation test lists what you can control using only the physical buttons on the robot vacuum itself. This has become increasingly simple, while the Companion App Automation test has become increasingly complicated as companion apps have become more complex, with more features and fine-grained control of each feature.
Writing
The tester conducts the tests, takes the videos, and takes the pictures, noting everything down in the tester's notes. Another tester then reviews the test results, looking to spot any technical errors, any results that need a retest or further investigation, or any inconsistencies with the tests themselves or with the way the original tester implemented them. The writer then looks over the test results and the tester's notes, trying to see whether the results of these tests agree with observations by other users or reviewers and whether the test results make sense. We call this the writer's validation step.
Once everyone agrees, the writer starts writing the review. This writing isn't merely a reiteration of the test results; the writer aims to explain the results, compare the results to others, and draw attention to important findings in the tester's notes. In addition to interpreting test data and condensing it into a readable format, the writer also writes the review's Introduction, Verdict, Variants, and Compared sections, plus Side-by-Side comparisons to comparable robot vacuums. The Introduction discusses the robot vacuum's features and its position in the market. The Verdict boxes summarize the suitability of the robot vacuum for a given usage based on a weighted mix of the test scores. The Compared section provides a quick glimpse of the robot vacuum's strengths and weaknesses compared to other robot vacuums and shows the type of usage where it would serve you best. The Side-by-Side comparisons are very specific comparisons between two particular robot vacuums, outlining which one is better based on its performance and other factors.
It takes a while to write robot vacuum reviews since there's so much information to cover. After the writer completes a first draft, a second writer and the tester look it over, pointing out factual, technical, spelling, grammar, or tone errors. The writer corrects these errors, the second writer has one final look, then it's on to editing to look for any errors that may have escaped the first round. The editors also check that the review is consistent with the style and tone of the rest of the site so that it fits in seamlessly.
Recommendations
Our writers regularly update the recommendation articles so that they remain current and all recommended products are still available. If a newly reviewed robot vacuum fits in with our recommendations, we'll be sure to include it the next time the article is updated. We publish recommendation articles so that you don't have to read through all our reviews to find a robot vacuum that meets your needs. We don't recommend robot vacuums by scores alone; we take into account availability, cost versus performance, and other factors. We always recommend several robot vacuums at varying costs, as well as alternatives and notable mentions. The recommendation articles are divided up by usage, by brand, by type, and by price.
Inventory, Retesting, And Test Bench Updates
After testing, we put the products in inventory. You might see them sitting in the background of our review photos. We keep them for a while so that we can retest them. We retest a robot vacuum if a new feature has been introduced and the community wants to see this new feature in action. We also retest if a serious error in the review has somehow slipped by our multiple checks. Once we've retested a product, the writer will revise the affected parts of the review, adjusting wording to reflect new scores, correcting errors, or adding new information. We still use multiple checks from testers and other writers to make sure everything is correct before passing it on to our editing team, who conduct a final look-over before publishing it on the site. We make sure to include a public message in the revised review showing what changes were made so that all readers will be aware of it.
Keeping reviewed units on hand is also convenient when we have a test bench update. We're always looking to improve our test benches, and we always take your feedback into account. If you see a problem with how we test robot vacuums or have any suggestions for improvement, please let us know in the forums, on Discord, or by emailing feedback@rtings.com. We can then retest robot vacuums in batches, revising and editing the reviews to show the results of the new tests and changes in the scores.
Finally, there comes a point when keeping the robot vacuum is no longer useful. It could be discontinued, irrelevant, or unpopular. Once several team members agree, we'll sell it to make room for new units.
Conclusion
So that's our look at how we test robot vacuums. We're proud of our work at RTINGS.com and always want to improve to better serve your needs. We truly value your feedback. Be sure to let us know how we're doing and how we can get even better!